Face X-ray实验
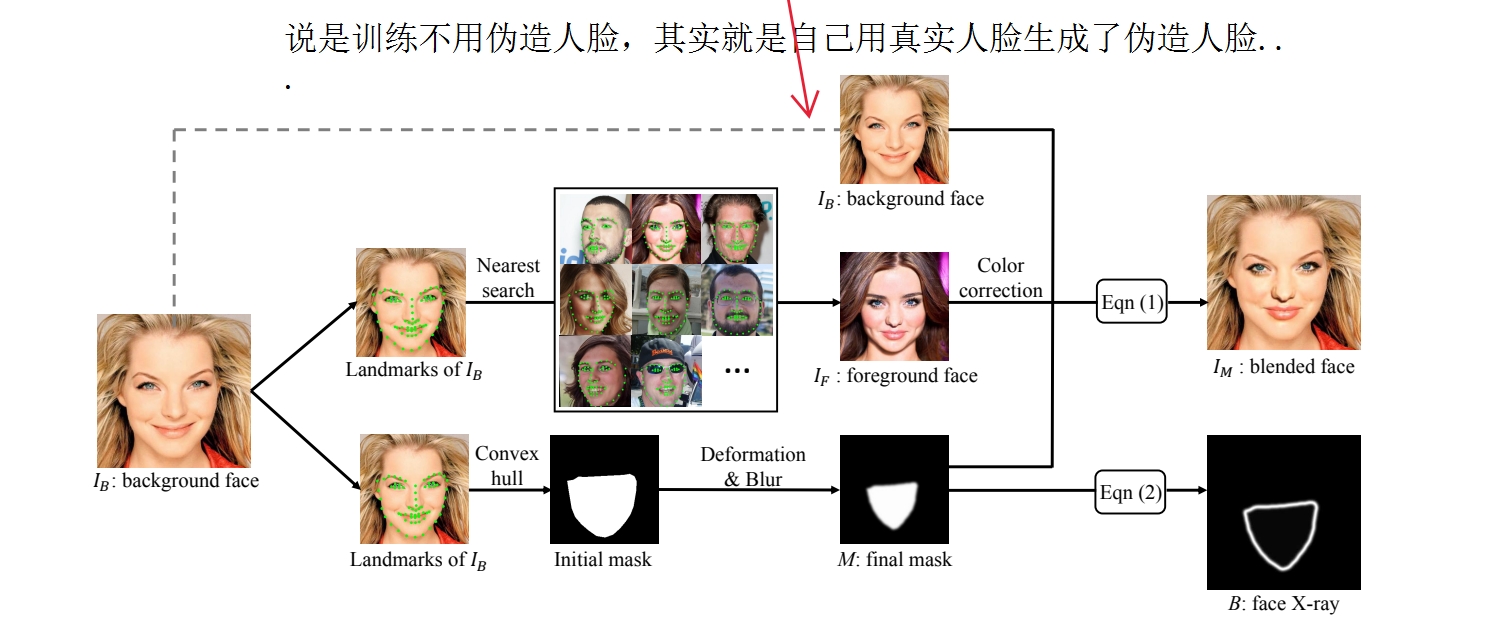
1 流程图及公式
1 流程图

2 公式1 混合

2.1 点积不是矩阵乘法
2.2 IF是前脸
2.3 IB是背景
2.4 M 是划定被操纵区域的面具,每个像素点的值被限制在0~1
2.5 混合前要colortransfor!
3 公式2

具体实验步骤
使用HRNet网络
将来自所有四种不同分辨率的表示拼接到相同大小的 64x64
经过一个输出通道为 1x1 卷积层
一个输出大小为 256x256 的双线性上采样层
一个 sigmoid 函数。
训练过程
batch_size设置为32
总迭代轮数设置为200,000
热启动
前50,000次迭代用ImgNet训练HRNet(可以直接找现成的权重)
后150,000微调,用bi数据集
学习率一开始设置成0.002,使用Adam优化器,在最后的 50,000 次迭代中线性衰减为 0。
For the fully convolutional neural network NNb in our framework, we adopt the recent ad- vanced neural network architecture, i.e., HRNet [42, 43], and then concatenate representations from all four different resolutions to the same size 64 ⇥ 64, followed by a 1 ⇥ 1 convolutional layer with one output channel, a bilinear up- sampling layer with 256 ⇥ 256 output size and a sigmoid function. In the training process, the batch size is set to 32 and the total number of iterations is set to 200, 000. To ease the training process of our framework, we warm start the re- maining layers with fixed ImageNet pre-trained HRNet for the first 50, 000 iterations and then finetune all layers to- gether for the rest 150, 000 iterations. The learning rate is set as 0.0002 using Adam [20] optimizer at first and then is linearly decayed to 0 for the last 50, 000 iterations.
2 具体步骤
json文件读取
首先要产生BI数据集
将数据集保存到json文件中,json文件是以字典形式存储
1 | with open("pre_computed_landmarks.json", "r") as f: |
图片读取与存取
利用skimage中io读取图片
1 | from skimage import io |
skimage.io.imread 返回的 NumPy 数组的默认格式是
HWC(Height, Width,
Channels),即图像的高度、宽度和通道信息,通道顺序是RGB
以张量形式读取图片
1 | read_image |
图片对象与数组对象的转换
numpy
1 | import numpy as np |
PIL
1 | from PIL import Image |
增加图片多样性(或者叫图片增广)
上采样
最近邻插值
1 | face_img = face_img.resize((aug_size, aug_size), Image.NEAREST) |
双线性插值
1 | face_img = face_img.resize((aug_size, aug_size), Image.BILINEAR) |
图片压缩
1 | # 随意生成压缩尺寸 使用 OpenCV 中的 cv2.IMWRITE_JPEG_QUALITY 常量来指定 JPEG 图像的编码质量参数,并将其与具体的质量值 quality 组成一个列表 encode_param。 |
图片裁剪:就是切片
1 | face_img = face_img[60:317, 30:287, :] |
图像反转
水平翻转
1 | face_img = np.flip(face_img, 1) |
垂直翻转
1 | face_img = np.flip(face_img, 0) |
定义计算人脸图片的68个数据点(也可以封装成一个类)
核心
1 | # 读入图片,一般用cv2的库 |
如果想将读取的68个人脸数据点保存成如下格式
1 | {"000_0000.png": [[56, 143], [57, 168], [61, 192], [67, 216], [76, 238], [93, 257], [112, 273], [133, 288], [156, 291], [178, 287], [198, 271], [219, 256], [236, 237], [246, 216], [250, 192], [252, 167], [252, 142], [69, 131], [84, 123], [102, 123], [119, 126], [137, 132], [178, 130], [195, 122], [213, 119], [230, 119], [244, 126], [158, 149], [158, 168], [158, 186], [159, 205], [140, 211], [148, 214], [158, 219], [168, 214], [176, 210], [91, 150], [102, 143], [116, 144], [127, 154], [115, 156], [101, 156], [188, 152], [199, 142], [213, 141], [224, 148], [214, 153], [201, 154], [117, 232], [134, 229], [148, 228], [158, 231], [168, 228], [181, 229], [195, 232], [182, 246], [169, 253], [158, 254], [147, 254], [132, 247], [125, 234], [147, 238], [158, 239], [168, 237], [188, 234], [168, 237], [158, 239], [147, 238]], "001_0000.png": [[56, 143], [57, 168], [61, 192], [67, 216], [76, 238], [93, 257], [112, 273], [133, 288], [156, 291], [178, 287], [198, 271], [219, 256], [236, 237], [246, 216], [250, 192], [252, 167], [252, 142], [69, 131], [84, 123], [102, 123], [119, 126], [137, 132], [178, 130], [195, 122], [213, 119], [230, 119], [244, 126], [158, 149], [158, 168], [158, 186], [159, 205], [140, 211], [148, 214], [158, 219], [168, 214], [176, 210], [91, 150], [102, 143], [116, 144], [127, 154], [115, 156], [101, 156], [188, 152], [199, 142], [213, 141], [224, 148], [214, 153], [201, 154], [117, 232], [134, 229], [148, 228], [158, 231], [168, 228], [181, 229], [195, 232], [182, 246], [169, 253], [158, 254], [147, 254], [132, 247], [125, 234], [147, 238], [158, 239], [168, 237], [188, 234], [168, 237], [158, 239], [147, 238]]} |
1 | landmarks_dic = {} |
定义生成BI数据集的类
初始化
读取json文件到内存字典中
json文件中key是图片路径,value是68个数据点
如何计算:
定义只包含图片路径的列表
定义生成遮罩时的仿射变换
生成一个“数据点”,包括backgroundface,foregroundface,类型(fake or real), mask
从图片路径列表中随机选择一个图片的路径
按50%随机生成图片类型(fake or real)
如果是fake,生成混合后的图片并利用公式2将得到的mask转换成FaceXray
根据给定的backgroundface路径读取图片对象和对应的68个数据点
在数据集中搜索相似的脸作为前脸
先随机选取1000个图片路径,并且剔除和backgroundface来自同一个视频(数据集里保存在同一个文件夹下的)
通过计算两张图片的68个数据点的欧氏距离来判断相似度,找到欧式距离最小的那个作为frontface
根据backgroundface和其landmark生成4种mask
将mask进行仿射变换,随机腐蚀和膨胀来增强mask的多样性可以参考这篇文章
混合前对foregroundface进行颜色变换以适应backgroundface
将mask,foregroundface和backgroundface混合
如果是real,直接读取图片,并且生成mask的灰度图
注:所有图片的大小都是317 * 717
最终生成bi数据集的结构
影响:MyGetBIDataset 271行save_bi_dataset
bi_dataset
1 | | —— true |
获得当时数据集最后格式的方法:切片+解包
比如对于your/file/000/background_face.jpg,要获取000/background_face.jpg,用如下写法
1 | import os |
命名的时候用是第几张图片命名
如何优雅地用一行代码计算一个文件夹里所有文件的数量
利用列表推导式和匿名函数实现
1 | count_files = lambda folder_path : len([f for f in os.listdir(foler_path) if os.path.isfile(os.path.join(folder_path, f))]) |
computer_landmarksbug修复
用try-except
直接往文件里面写
处理错误
定义保存错误信息的文件位置
配置错误函数
将错误写入错误函数指向的文件
1 | try: |
定义数据集dataset(封装成一个类)
需要写入h5文件
h5文件里面要包含些什么?
HRNet网络的使用
HRNet网络介绍

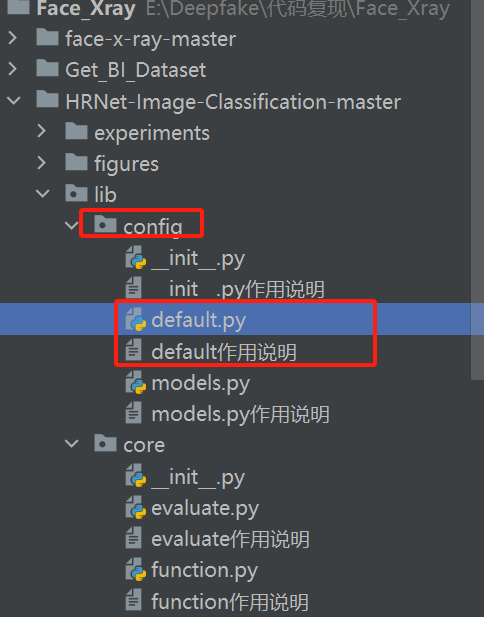
从官方下载HRNet的网络
其中加载预训练模型的位置

default中
1 | common params for NETWORK |
default作用说明里有这句
1 | 定义模型配置,_C.MODEL: |
在default搜索_C.MODEL,发现
1 | _C.MODEL.PRETRAINED = '' |
修改为之前下载的预训练函数位置
default.py中输出种类
1 | _C.MODEL.NUM_CLASSES = 2 |
default.py中修改传入的图片大小
1 | _C.MODEL.IMAGE_SIZE |
修改传入的图片种类
1 | _C.DATASET.DATA_FORMAT = 'png' |
default中
1 | DATASET related params |
传入的图片种类
1 | _C.DATASET.DATA_FORMAT = 'png' |
数据集根路径
1 | _C.DATASET.ROOT = '' |
default中
1 | # train |
迭代轮数 1
_C.TRAIN.END_EPOCH = 150000
batch_size设置为32
1 | _C.TRAIN.LR = 0.002 |
总迭代轮数设置为200,000
1 | _C.TRAIN.END_EPOCH = 200000 |
学习率一开始设置成0.002
1 | _C.TRAIN.LR = 0.002 |
使用Adam优化器
1 | _C.TRAIN.OPTIMIZER = 'adam' |
在最后的 50,000 次迭代中线性衰减为 0。
1 |
在tools/train.py中找到data_loader
lib/core/function.py中定义了训练函数
我还是有点懵,这到底怎么传文件啊
我现在就是按它哪个要求修改了分类的参数,但还是迷糊